iOS单元测试
Xcode集成了对测试的支持,其中单元测试使用的是XCTest框架
<XCTest/XCTest.h>,良好的单元测试可以提高产品的稳定性,快速定位bug,节省开发时间。确实能节省时间,babybluetooth的开发中,每次有修改后总是要进行手动测试费时费力效果还不好,在折腾过一阵子之后,我决定开始写单元测试,为自己节省时间。
本文主要介XCTest单元测试的基础,测试方法,断言,期望,测试命令等等。
quick start
在xcode新建项目中,默认都会给你建一个单元测试的target,如果你的项目没有,可以在导航中选择 File->New->Target->选择ios-test->选择iOS Unit Testing Bundle 新建一个测试target。
建好后默认会建一个测试类,代码如下:
//
// BasicTests.m
// BabyBluetoothAppDemo
//
// Created by ZTELiuyw on 16/3/9.
// Copyright © 2016年 刘彦玮. All rights reserved.
//
#import <XCTest/XCTest.h>
@interface BasicTests : XCTestCase
@end
@implementation BasicTests
- (void)setUp {
[super setUp];
// Put setup code here. This method is called before the invocation of each test method in the class.
}
- (void)tearDown {
// Put teardown code here. This method is called after the invocation of each test method in the class.
[super tearDown];
}
- (void)testExample {
// This is an example of a functional test case.
// Use XCTAssert and related functions to verify your tests produce the correct results.
}
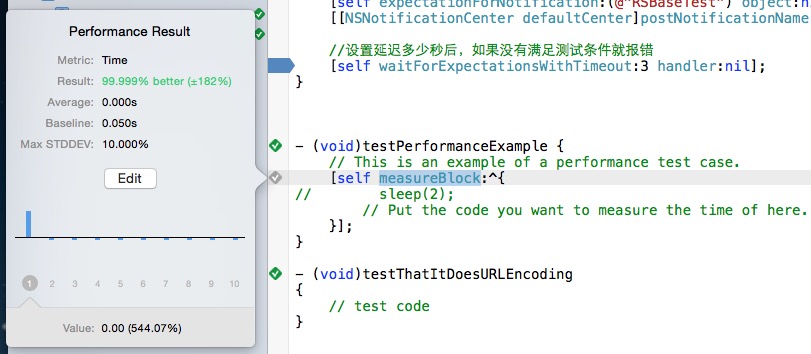
- (void)testPerformanceExample {
// This is an example of a performance test case.
[self measureBlock:^{
// Put the code you want to measure the time of here.
}];
}
@end
其中有几点需要大家注意:
- 1:该类中以test开头的方法且void返回类型的方法都会变成单元测试用例
- 2:单元测试类继承自XCTestCase,他有一些重要的方法,其中最重要的有3个,
setUp ,tearDown,measureBlock
//每次测试前调用,可以在测试之前创建在test case方法中需要用到的一些对象等
- (void)setUp ;
//每次测试结束时调用tearDown方法
- (void)tearDown ;

//性能测试方法,通过测试block中方法执行的时间,比对设定的标准值和偏差觉得是否可以通过测试
measureBlock
断言
大部分的测试方法使用断言决定的测试结果。所有断言都有一个类似的形式:比较,表达式为真假,强行失败等。
//通用断言
XCTAssert(expression, format...)
//常用断言:
XCTAssertTrue(expression, format...)
XCTAssertFalse(expression, format...)
XCTAssertEqual(expression1, expression2, format...)
XCTAssertNotEqual(expression1, expression2, format...)
XCTAssertEqualWithAccuracy(expression1, expression2, accuracy, format...)
XCTAssertNotEqualWithAccuracy(expression1, expression2, accuracy, format...)
XCTAssertNil(expression, format...)
XCTAssertNotNil(expression, format...)

XCTFail(format...) //直接Fail的断言
举个栗子
- (void)testExample {
    //设置变量和设置预期值
    NSUInteger a = 10;NSUInteger b = 15;
    NSUInteger expected = 24;
    //执行方法得到实际值
    NSUInteger actual = [self add:a b:b];
    //断言判定实际值和预期是否符合
    XCTAssertEqual(expected, actual,@"add方法错误!");
}
-(NSUInteger)add:(NSUInteger)a b:(NSUInteger)b{
    return a+b;
}
从这也能看出一个测试用例比较规范的写法,1:定义变量和预期,2:执行方法得到实际值,3:断言
性能测试
性能测试主要使用 measureBlock 方法 ,用于测试一组方法的执行时间,通过设置baseline(基准)和stddev(标准偏差)来判断方法是否能通过性能测试。
举个栗子:
- (void)testPerformanceExample {
    // This is an example of a performance test case.
    [self measureBlock:^{
		  //Put the code you want to measure the time of here.
		  //你的性能测试的代码放在这里
    }];
}
直接执行方法,因为block中没有内容,所以方法的执行时间为0.0s,如果我们把baseline设成0.05,偏差10%,是可以通过的测试的。但是如果设置如果我们把baseline为1,偏差10%,那测试会失败,因为不满足条件。
期望
期望实际上是异步测试,当测试异步方法时,因为结果并不是立刻获得,所以我们可以设置一个期望,期望是有时间限定的的,fulfill表示满足期望
举个栗子
    - (void)testAsynExample {
    XCTestExpectation *exp = [self expectationWithDescription:@"这里可以是操作出错的原因描述。。。"];
    NSOperationQueue *queue = [[NSOperationQueue alloc]init];
    [queue addOperationWithBlock:^{
        //模拟这个异步操作需要2秒后才能获取结果,比如一个异步网络请求
        sleep(2);
        //模拟获取的异步操作后,获取结果,判断异步方法的结果是否正确
        XCTAssertEqual(@"a", @"a");
        //如果断言没问题,就调用fulfill宣布测试满足
        [exp fulfill];
    }];

    //设置延迟多少秒后,如果没有满足测试条件就报错
    [self waitForExpectationsWithTimeout:3 handler:^(NSError * _Nullable error) {
        if (error) {
            NSLog(@"Timeout Error: %@", error);
        }
    }];
}
这个测试肯定是通过的,因为设置延迟为3秒,而异步操作2秒就除了一个正确的结果,并宣布了条件满足 [exp fulfill],但是当我们把延迟改成1秒,这个测试用例就不会成功,错误原因是 expectationWithDescription:@"这里可以是操作出错的原因描述。。。
异步测试除了使用 expectationWithDescription以外,还可以使用 expectationForPredicate和expectationForNotification
下面这个例子使用expectationForPredicate 测试方法,代码来自于AFNetworking,用于测试backgroundImageForState方法
- (void)testThatBackgroundImageChanges {
    XCTAssertNil([self.button backgroundImageForState:UIControlStateNormal]);
	NSPredicate *predicate = [NSPredicate predicateWithBlock:^BOOL(UIButton  * _Nonnull button, NSDictionary<NSString *,id> * _Nullable bindings) {
	        return [button backgroundImageForState:UIControlStateNormal] != nil;
    }];

    [self expectationForPredicate:predicate
              evaluatedWithObject:self.button
                          handler:nil];
    [self waitForExpectationsWithTimeout:20 handler:nil];
}
利用谓词计算,button是否正确的获得了backgroundImage,如果正确20秒内正确获得则通过测试,否则失败。
expectationForNotification 方法 ,该方法监听一个通知,如果在规定时间内正确收到通知则测试通过。
- (void)testAsynExample1 {
    [self expectationForNotification:(@"监听通知的名称xxx") object:nil handler:nil];
    [[NSNotificationCenter defaultCenter]postNotificationName:@"监听通知的名称xxx" object:nil];

    //设置延迟多少秒后,如果没有满足测试条件就报错
    [self waitForExpectationsWithTimeout:3 handler:nil];
}
这个例子也可以用expectationWithDescription实现,只是多些很多代码而已,但是这个可以帮助你更好的理解 expectationForNotification 方法和 expectationWithDescription 的区别。同理,expectationForPredicate方法也可以使用expectationWithDescription实现。
 func testAsynExample1() {
    let expectation = expectationWithDescription("监听通知的名称xxx")
    let sub = NSNotificationCenter.defaultCenter().addObserverForName("监听通知的名称xxx", object: nil, queue: nil) { (not) -> Void in
        expectation.fulfill()
    }
    NSNotificationCenter.defaultCenter().postNotificationName("监听通知的名称xxx", object: nil)
    waitForExpectationsWithTimeout(1, handler: nil)
    NSNotificationCenter.defaultCenter().removeObserver(sub)
}
命令行测试
测试不仅可以在xcode中执行,也可以在命令行中执行,这个便于代码持续集成和构建,在git提交中也编译检查代码
如果你有development-enabled设备插入,你可以按照名称或 id 调用他们。例如,如果你有一个名为”Development iPod touch”的 iPod 设备连接了测试的代码,可以使用下面的命令来测试代码
> xcodebuild test -project MyAppProject.xcodeproj -scheme MyApp -destination 'platform=iOS,name=Development iPod touch
测试也可以在 iOS模拟器上运行。使用模拟器可以应对不同的外形因素和操作系统版本。例如
> xcodebuild test -project MyAppProject.xcodeproj -scheme MyApp -destination 'platform=iOS Simulator,name=iPhone,0S=7.0'
-destination 参数可以被连接在一起,这样你只需使用一个命令,就可以跨目标进行指定集成共享方案。例如,下面的命令把之前的三个例子合并到一个命令中
> xcodebuild test -project MyAppProject.xcodeproj -scheme MyApp
-destination 'platform=OS X,arch=x86_64'
-destination 'platform=iOS,name=Development iPod touch'
-destination 'platform=iOS Simulator,name=iPhone,0S=7.0'
关于更多xcodebuild的使用可以查看man手册 > man xcodebuild
执行测试快捷键
- cmd + 5 切换到测试选项卡后会看到很多小箭头,点击可以单独或整体测试
- cmd + U 运行整个单元测试
注意点
都是血与泪的教训
- 使用pod的项目中,在XC测试框架中测试内容包括第三方包时,需要手动去设置Header Search Paths才能找到头文件 ,还需要设置test target的PODS_ROOT。
- xcode7要使用真机做跑测试时,证书必须配对,否则会报错
exc_breakpoint错误 - XCTestExpectation的fulfill方法只能调用一次,系统不会帮你检查,如果你调用两次就会出错,而且你经常都找不到错在哪里。
参考阅读
- cocoachina测试专题
- iOS单元测试(作用及入门提升)
- In what situation would one use expectationForNotification in swift testing
- [XCTest 测试实战](http://www.objccn.io/issue-15-2/)
- WWDC15 Session笔记 - Xcode 7 UI 测试初窥
最后
感谢收看,如果对大家有帮助,请github上follow和star,本文发布在刘彦玮的技术博客,转载请注明出处
